Overview
Email integration allows your agent to automatically respond to emails. There are two modes:- Generated inbox - Lua creates a dedicated email address for your agent (e.g.
[email protected]) - Existing email - Use your own email address (e.g.
[email protected]) with forwarding
Professional
Business-appropriate channel
Universal
Everyone has email
B2B Friendly
Preferred for business
Threaded
Conversation threading
How It Works
- Generated Inbox
- Existing Email
Connection Method 1: CLI
- Generated Inbox
- Existing Email
Connection Method 2: Admin Dashboard
Open the dashboard
Open your agent and add a channel
Click Agents in the main side navigation, select your agent’s card, click the + (plus) icon to add a channel, then choose Email.
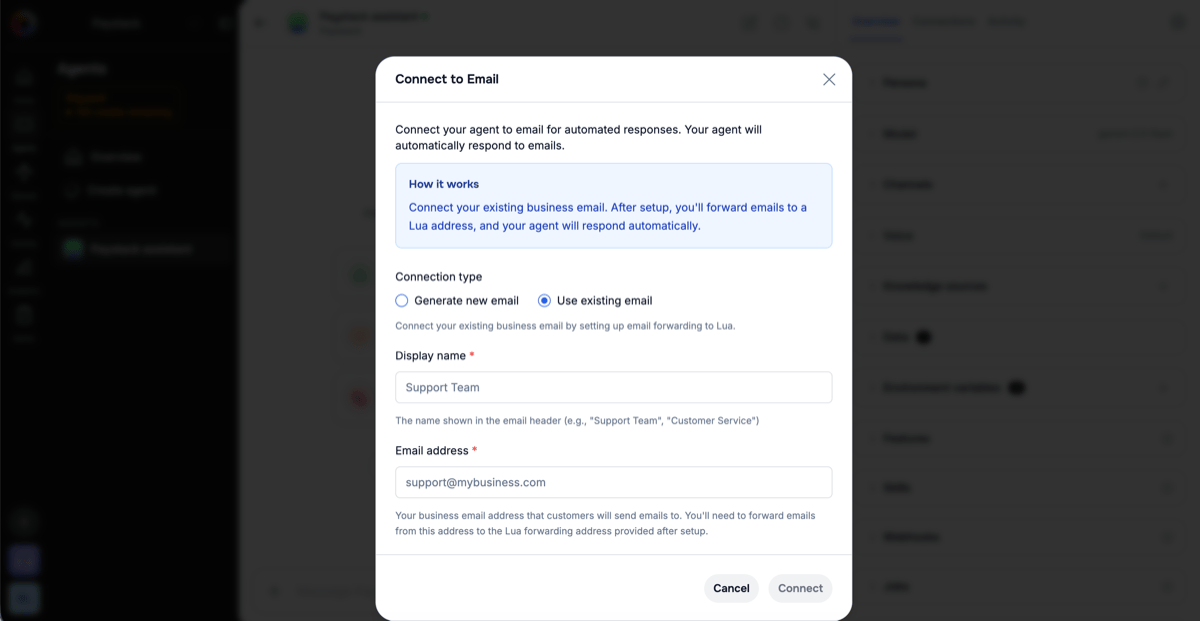
Choose a connection type
In the Connect to Email dialog, enter a Display name (shown in the email header, e.g. “Support Team”) and pick how to connect, then click Connect.
- Generate new email
- Use existing email
Lua creates a new email address your customers can email directly.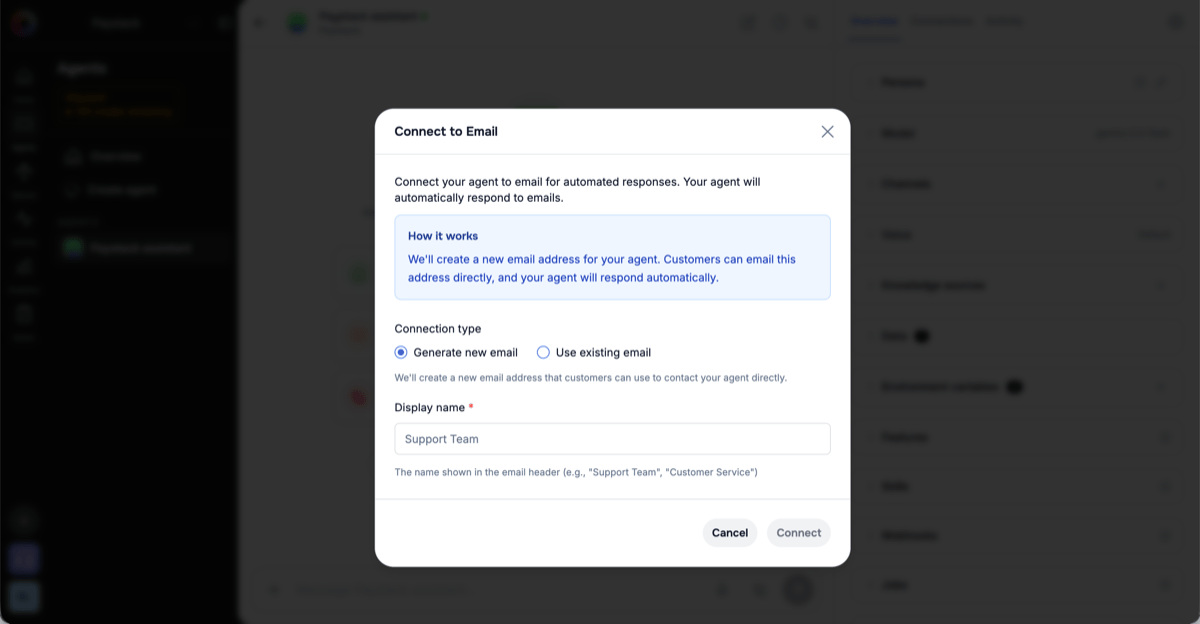
Finish setup
- Generated — Lua shows “Your email address is ready!” with the new address. Copy it and share it with your customers.
- Existing — Lua shows a forwarding address. Copy it and set up forwarding from your email provider (see Email Provider Setup below). Your agent only receives email once forwarding is active.
Email Provider Setup
- Gmail
- Outlook
- Google Workspace
- cPanel
Gmail Forwarding:
- Open Gmail Settings
- “Forwarding and POP/IMAP” tab
- “Add a forwarding address”
- Paste Lua forwarding address
- Check verification email
- Click verification link
- Return to Gmail settings
- Enable “Forward a copy”
Testing
Send a test email
Email your connected address — the generated address, or your business address once forwarding is set up:
Check Activity → Logs
In the admin dashboard, open Activity → Logs. You’ll see the inbound email and your agent’s response there as it’s processed.
Accessing Email Metadata in Tools
For inbound emails,Lua.request.webhook.payload is populated with a JMAP-aligned object containing parsed message metadata. Use this to build threaded replies, deduplicate by Message-ID, read custom headers, or implement conversation threading.
Attachments and Embedded Images
Inbound emails can carry files two ways, and both reach your agent as file parts alongside the message text:- Regular attachments (the paperclip) — always forwarded, no size restrictions.
- Embedded images (pasted or dragged into the compose window, e.g. in Gmail) — forwarded when they are genuinely part of the message: the image must be referenced from the email’s HTML body, be an image type, and be at least 1 KB (filters out 1×1 spacer pixels). Up to 10 embedded images per email are forwarded.
Email clients insert a plain-text placeholder like
[image: photo.png] where an embedded image sits in the body. That placeholder still appears in the message text your agent sees — but the actual image now arrives as a separate image part. Don’t try to parse the placeholder; use the image part.- Remote-hosted images are not fetched. Images referenced by URL — for example Gmail signature images, which are hosted rather than embedded — are not downloaded. Only data actually transmitted in the email is processed.
- Embedded signature logos may come through. Some email clients (commonly corporate Outlook setups) embed signature logos directly in the message. An embedded logo over 1 KB is indistinguishable from a content image and will reach your agent as an image part. If your users’ emails are signature-heavy, consider instructing your agent to disregard branding imagery.
- Mislabeled attachments are recovered. Some clients mark real attachments as embedded content; these are detected and forwarded as normal attachments rather than dropped.
Best Practices
Professional Tone
Professional Tone
Email is a more formal channel than chat. If your agent’s core persona is casual or emoji-heavy, that style will carry into its emails unless you account for it. Prompt-engineer any skills or tools that generate email content to enforce a more formal tone — for example, instruct them to avoid emojis, use proper greetings and sign-offs, and write in complete paragraphs. This keeps email responses professional even when the underlying persona is playful elsewhere.
Response Time
Response Time
- Aim for < 1 hour response
- Set auto-reply for delays
- Mention expected response time
Formatting
Formatting
- Use proper paragraphs
- Include signature
- Format lists clearly
- Proofread responses
Next Steps
Website Widget
Add chat to website
All Channels
View all options